My Workflow- After the fun of taking photos.
I really enjoy taking photos, and I know this the main 'fun" part for Jill also.
But I also enjoy a modicum of post-production work, and I also know how important a good cataloguing and archival system is with digital photography.
 So, when Adobe Lightroom made its first appearance as a Beta product back in 2006, I decided to put all my "eggs in the basket" and use Lightroom as my only archival, indexing and post production tool of choice.
I do, very occasionally "mess around" with Photoshop, and NIK software, but for the most part, all of my post capture work uses Lightroom.
I do very little "hard core" post production, I mostly concentrate on straightening, cropping, tone adjustments, and where necessary, cloning out unsightly blemishes.
The new import dialogue in the latest LR Classic is very good, and I always import to a folder on my Drobo 5D, which is connected via Thunderbolt to the Mac. If I am away from home, I import to a Thunderbolt portable G drive. I also make a backup on import, to a portable Thunderbolt Lacie rugged drive. It's a bit "overkill" I know, but it makes me happy!
I use the import presets extensively, so I have configured a separate metadata import preset for Jill's photos and for mine. These involve setting owner/creator information, copyright status and copyright Creative Commons status. I don't write keywords as part of these import presets as I prefer to do the keyboarding manually.
I also have separate develop presets which are applied on import. These take advantage of the individual camera profiles, and at the same time apply Lightroom's Auto straightening, lens profiles and as of the current version of LR CC classic, the new Auto tone feature...which is excellent.
That's it. My first pass "cull" is done. I am very severe and anything that has been flagged with an "X" is deleted from the catalogue, and the Drobo...gone for good!
After this, I go back into library grid mode, and using the "Attributes" menu option I select to only now see any image with 3 stars or above. At this stage I will do a second pass culling and relegate to 2 stars those that I don't think will make this second pass cull. I will also. promote to 4 stars, and 5 stars those images that need post production work to hopefully make them into half decent photos!
 So, when I am out and about taking photos I now use the iPhone app "GeoTagPhotos2".
This app silently creates a GPS track log, which when I am finished, quickly and easily uploads to my dropbox account.
Once I have finished step 2 above, I select the "Previous Import" catalogue again, and invoke the LR Plug In Extras, selecting the aforementioned GeoEncoding plugin. The dialogue boxes that Jeffrey has created allow me to quickly select the track log from my dropbox, and to use that as the source to Geoencode the remaining images. But that is only half the job! For some strange reason, Adobe writes the GPS location as "suggested locations" only. These suggested locations are in italics in the EXIF data fields and whilst they remain suggested, they are not able to be used and written as output information. So back to Jeffrey's plugin, and I simply select "Bulk Reverse geoencode, once again select all the images in the "Previous Import" catalogue and invoke the reverse geoencode. This process uses the GPS data and writes actual location fields rather than suggestions! There is no difference ion the information, its just that Jeffrey's plugin writes the data as "actual data" rather than "suggested data"!...Go figure!!!
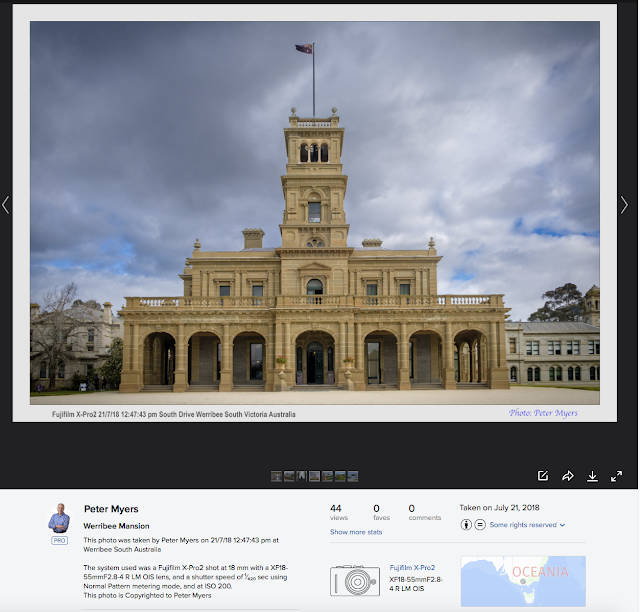 The plugin creates a template, which makes use of the EXIF data and the newly written Geodata. My caption simply uses the camera data (Exif data), camera settings (Exif Data) the creator (Exif Data), the date and time (Exif Data), and the location (Geo Data). I find that as a caption, this data is easily accessible when I look back on a photo in the months and years to come.
Almost always I start with cropping where necessary.
After this I make sure the horizons and verticals are straight.
At this stage I may "experiment" with different camera profile settings and different develop presets, just to see if there is anything I like.
After this, I try to clone out any unwanted image parts.
And then finally I will use the develop brush, or gradient tool to apply local adjustments, usually altering exposure, highlights, shadows, clarity and sharpening.
I finish off with global adjustments such as sharpening, clarity etc.
If I have used my Samyang fisheye lens I will also experiment with the Hemi De-Fisheye plugin to see if that makes the fisheye photo less "fishy".

And finally, I will experiment with selected images to see if they look more "pleasing' in Black & White. For this I use the excellent Nik Silver Efex Pro 2 plugin in, which creates a TIF file to sit alongside the original file in the Lightroom catalogue.
That's it...Post production done!
I use a very simple keyboarding hierarchy structure:
- People
- Places
- Events
- Seasons
- Type
- Anything Else
I usually find that I can apply multiple keywords to multiple images, so the keywording process doesn't take too long at all.
At this stage, I also use yet another Jeffrey Friedl plug In called "Folder Status". This is a very simple plugin in that allows me to check for each folder of images in my entire catalogue, I have created my own rules relating to my own workflow. So before I do anything further I invoke this plug in, which I have configured to check...
- That I have deleted "cruft" (Crap Images)
- That I have Star rated all images
- That I have Keyworded all images
- That I have Geocoded all images
- That I have Performed Reverse Geo lookup on all images
- That I have Created image captions
- That I have Created an image title (as appropriate)
- That I have Filled in copyright and create commons attributes for all images.
The only one of these steps that requires my manual intervention is to create Titles, and I only do this for those images I intend to publish (usually those I have rated 4 stars and above). Everything else is automated.
I use a number of cloud based photo publishing services to publish my 4 star and above rated images, and of course I also have my own website which is my main platform for publishing our images.
So once again, I make use of Lightroom's automation features, and yet more of Jeffrey Friedl's plugins. This time I use his publish plugins to my accounts at:
- Google Drive
- Flickr
- Smug Mug (Where my own website is hosted)
- Local Hard Drive
I have configured each publish service to create a Lightroom "Smart" catalogue which adds to the catalogue images of 4 star and above.
I also use another plug in called "LR/Mogrify" by Timothy Armes, which creates image borders, and creates image text and attributes, using the standard EXIF data, and the information created above. You can see what I mean in the image below.

Once again, this is done automatically, and Jeffrey's publish service is configured to start the upload to each of these services when I have gone to bed...and when Australia's "legendary" internet infrastructure has some bandwidth to at least allow uploads to take place!
I also have a fifth repository, Amazon Photos. I have configured there Amazon uploader to automatically upload to my Amazon drive the photos exported to my local hard drive!
So there you have it, publishing and backup to multiple destinations!
But I also enjoy a modicum of post-production work, and I also know how important a good cataloguing and archival system is with digital photography.
I do, very occasionally "mess around" with Photoshop, and NIK software, but for the most part, all of my post capture work uses Lightroom.
I do very little "hard core" post production, I mostly concentrate on straightening, cropping, tone adjustments, and where necessary, cloning out unsightly blemishes.
Step 1- Importing Photos
This is probably the most important step. I have two separate LR catalogues, one for Jill's images and one for mine. When we get back from a shoot, I immediately insert the SD card from Jill's camera. into my Mac Book Pro, launch Lightroom, and follow the process below. I then "rinse and repeat" for my own photos and my own separate catalogue!The new import dialogue in the latest LR Classic is very good, and I always import to a folder on my Drobo 5D, which is connected via Thunderbolt to the Mac. If I am away from home, I import to a Thunderbolt portable G drive. I also make a backup on import, to a portable Thunderbolt Lacie rugged drive. It's a bit "overkill" I know, but it makes me happy!
I use the import presets extensively, so I have configured a separate metadata import preset for Jill's photos and for mine. These involve setting owner/creator information, copyright status and copyright Creative Commons status. I don't write keywords as part of these import presets as I prefer to do the keyboarding manually.
I also have separate develop presets which are applied on import. These take advantage of the individual camera profiles, and at the same time apply Lightroom's Auto straightening, lens profiles and as of the current version of LR CC classic, the new Auto tone feature...which is excellent.
Step 2 - Culling
When the import is finished, I simply switch to the Library module of LR, and select the "previous Import" catalogue which Lightroom creates automatically, selecting "loupe viewing mode, not grid viewing mode. I hit the "F" key to see the images full screen, an then I simply Tab through the entire selection of images, marking them with an "X" if they are rubbish, a "3 star" if they are OK and need one work on them, and if I see any exceptional images I give them a 4 star, or very rarely a 5 star.That's it. My first pass "cull" is done. I am very severe and anything that has been flagged with an "X" is deleted from the catalogue, and the Drobo...gone for good!
After this, I go back into library grid mode, and using the "Attributes" menu option I select to only now see any image with 3 stars or above. At this stage I will do a second pass culling and relegate to 2 stars those that I don't think will make this second pass cull. I will also. promote to 4 stars, and 5 stars those images that need post production work to hopefully make them into half decent photos!
Step 3 - Geoencoding
For a long time, I have been a big fan of Jeffrey Friedl and his excellent Lightroom plugins. I have, however only just started using his Geoencoding plugin.
This app silently creates a GPS track log, which when I am finished, quickly and easily uploads to my dropbox account.
Once I have finished step 2 above, I select the "Previous Import" catalogue again, and invoke the LR Plug In Extras, selecting the aforementioned GeoEncoding plugin. The dialogue boxes that Jeffrey has created allow me to quickly select the track log from my dropbox, and to use that as the source to Geoencode the remaining images. But that is only half the job! For some strange reason, Adobe writes the GPS location as "suggested locations" only. These suggested locations are in italics in the EXIF data fields and whilst they remain suggested, they are not able to be used and written as output information. So back to Jeffrey's plugin, and I simply select "Bulk Reverse geoencode, once again select all the images in the "Previous Import" catalogue and invoke the reverse geoencode. This process uses the GPS data and writes actual location fields rather than suggestions! There is no difference ion the information, its just that Jeffrey's plugin writes the data as "actual data" rather than "suggested data"!...Go figure!!!
Step 4 - Create Captions
I also have another LR plugin that I use called "Search, Replace Transfer" written by John Beardsworth. I use this to automatically create captions for each image.
Step 5 - Basic Post Production
Now I am ready for some post production.Almost always I start with cropping where necessary.
After this I make sure the horizons and verticals are straight.
At this stage I may "experiment" with different camera profile settings and different develop presets, just to see if there is anything I like.
After this, I try to clone out any unwanted image parts.
And then finally I will use the develop brush, or gradient tool to apply local adjustments, usually altering exposure, highlights, shadows, clarity and sharpening.
I finish off with global adjustments such as sharpening, clarity etc.
If I have used my Samyang fisheye lens I will also experiment with the Hemi De-Fisheye plugin to see if that makes the fisheye photo less "fishy".

And finally, I will experiment with selected images to see if they look more "pleasing' in Black & White. For this I use the excellent Nik Silver Efex Pro 2 plugin in, which creates a TIF file to sit alongside the original file in the Lightroom catalogue.
That's it...Post production done!
Step 6 - Keywording and Validating My Personal Workflow
Keywords are an important part of my catalogue organisation strategy. At this stage I am now ready to keyword the images that remain.I use a very simple keyboarding hierarchy structure:
- People
- Places
- Events
- Seasons
- Type
- Anything Else
I usually find that I can apply multiple keywords to multiple images, so the keywording process doesn't take too long at all.
At this stage, I also use yet another Jeffrey Friedl plug In called "Folder Status". This is a very simple plugin in that allows me to check for each folder of images in my entire catalogue, I have created my own rules relating to my own workflow. So before I do anything further I invoke this plug in, which I have configured to check...
- That I have deleted "cruft" (Crap Images)
- That I have Star rated all images
- That I have Keyworded all images
- That I have Geocoded all images
- That I have Performed Reverse Geo lookup on all images
- That I have Created image captions
- That I have Created an image title (as appropriate)
- That I have Filled in copyright and create commons attributes for all images.
The only one of these steps that requires my manual intervention is to create Titles, and I only do this for those images I intend to publish (usually those I have rated 4 stars and above). Everything else is automated.
Step 7 - Publishing and Backing Up My Images
At this stage, by definition, all of the images I want to keep are stored on my Drobo 5D which is configured with dual drive redundancy. I also have a second TB Thunderbolt drive which I use to make a backup of the main Drobo. I have a "Carbon Copy Cloner" script that runs in the background and performs this backup automatically.I use a number of cloud based photo publishing services to publish my 4 star and above rated images, and of course I also have my own website which is my main platform for publishing our images.
So once again, I make use of Lightroom's automation features, and yet more of Jeffrey Friedl's plugins. This time I use his publish plugins to my accounts at:
- Google Drive
- Flickr
- Smug Mug (Where my own website is hosted)
- Local Hard Drive
I have configured each publish service to create a Lightroom "Smart" catalogue which adds to the catalogue images of 4 star and above.
I also use another plug in called "LR/Mogrify" by Timothy Armes, which creates image borders, and creates image text and attributes, using the standard EXIF data, and the information created above. You can see what I mean in the image below.

Once again, this is done automatically, and Jeffrey's publish service is configured to start the upload to each of these services when I have gone to bed...and when Australia's "legendary" internet infrastructure has some bandwidth to at least allow uploads to take place!
I also have a fifth repository, Amazon Photos. I have configured there Amazon uploader to automatically upload to my Amazon drive the photos exported to my local hard drive!
So there you have it, publishing and backup to multiple destinations!


Comments